As the number of apps and services deployed in Kubernetes environments grows, your environment is going to become more complex. Being able to manage policies at scale goes from a nice-to-have to an essential. Having a solution that enables you to automate processes and use the right tools to maintain consistency, efficiency, and security can help enormously. Fairwinds Insights is a solution that allows you to manage your policies at scale to help you maintain reliability, efficiency, and security in your Kubernetes deployments.
What you need to do is manage how the policies are enforced, what context they can be enforced in, and tune the severity of each out-of-the-box policy in Fairwinds Insights. The Policy Config feature within Fairwinds Insights enables you to define and enforce both out-of-the-box and custom policies across your Kubernetes environment. It allows you to set guardrails for your dev team, ensuring that they stay within the limits of best practices and organizational standards.
The Policy menu item is in the lower left in the Insights UI. Click into the Policy tab and you can see all the out-of-the-box policies that are included in Insights.
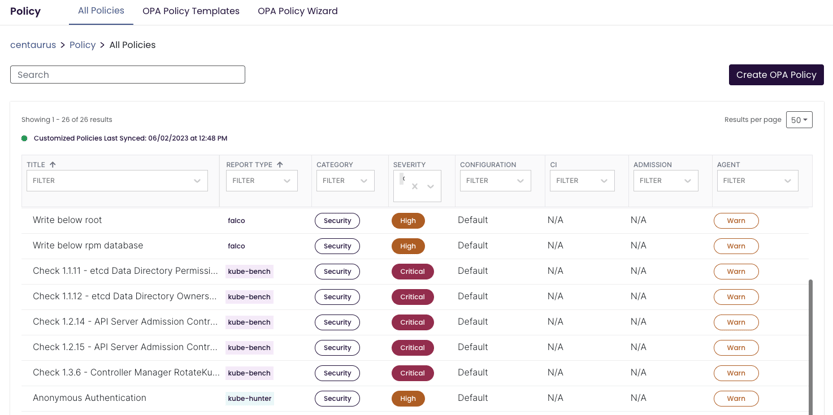
It’s easy to quickly filter by severity to understand what alert severity each policy will trigger. You can also see that any policy assigned a High to Critical severity level can be blocked at time of continuous integration (CI) or via admission controller. You can also manage the context, that is, where you are trying to enforce this policy. That could be in the CI process as you’re pushing a pull request (PR), in the Admission Controller at time of entry into the cluster, or simply as a way to augment the severity of an in cluster warning.
The first thing you need to do is take a look at the Fairwinds Insights documentation. The documentation will help you install the Fairwinds Insights Command-Line Interface (CLI). To do that, you also need to export your admin token from your organization’s Settings page at insights.fairwinds.com. Set that token in your environment using this command:
export FAIRWINDS_TOKEN=$YOUR_ADMIN_TOKEN
Next, you need to set up a YAML file, fairwinds-insights.yaml. It contains details for the CLI — including your organization and hostname (hostname is required for self hosted deployments).
options:
  organization: acme-co
  hostname: https://insights.example.com
That will associate your organization with any of the changes that you make in the Insights platform. By default, the CLI looks for the file fairwinds-insights.yaml in the current directory, but you can also configure its location by passing in the --config <filename> flag.
Now you’re almost ready to configure some policies. Let’s create fairwinds-insights.yaml, which you can set up for the Fairwinds Insights free tier if you want to try it out. Here’s an example:
options:
  organization: dextersfreetiertest
The next file that you need to construct is settings.yaml. Here’s an example:
checks:
  polaris:
    runAsRootAllowed:
      severity: medium
     livenessProbeMissing:
      severity: high
      ci:
        block: true
      admission:
       block: false
Let’s change the severity of a couple of the policies and augment the context to enforce liveness probe missing.
checks:
  polaris:
    runAsRootAllowed:
      severity: high
    livenessProbeMissing:
      severity: high
      ci:
        block: true
      admission:
       block: false
These settings allow us to define exactly the context for enforcing “liveness probe should be configured.” The default setting for a high severity action item is to block in both the CI and admission controller contexts.
If you look in Insights, you can see that the liveness probe should be configured setting is enforced by the Polaris policy engine.

In this screenshot, you can see that the severity is high and it's set to warn at CI and Agent, but block at Admission in our environment. So let’s go to the command line — make sure that the settings.yaml file and the fairwinds-insights.yaml file are in the same file path. Now you can run the insights-cli push settings command. This basically looks for your settings.yaml file in your current file path and pushes it back to your Insights tenant.

Once it runs successfully, you can refresh the Policies page and see that the customized policies were just synced and you have now changed the severity as well as the context. If you look in Insights after pushing this change, you can see that you are blocking at the time of CI.
We recommend storing all of these settings and values files at a git level and then pulling them down and pushing them into the platform.
Ready to get started? Using this approach, it takes all of two minutes for you to manage your policies. If you’re not already using Insights, the free tier is available for environments up to 20 nodes, two clusters, and one repo. Try it out to see how to manage and update your policies in Kubernetes at scale using Fairwinds policy config and the CLI tool. If you have any additional questions, please reach out or join our Slack Community.
Watch this short video, where I walk you through managing policy in Fairwinds Insights using the CLI tool.