A Kubernetes cluster is a powerful tool. It gives you the power to deploy your containerized workloads, automatically scale them, and schedule them across multiple machines. It can even open up a load balancer for your service to be exposed to the world (assuming you’re running in a supported cloud). Unfortunately, all of this functionality doesn’t come out of the box. You need DNS entries, path-based routing, TLS certificates, metrics, scaling, and role-based access control (RBAC). Over time, at Fairwinds, we have developed a set of tools that we run inside of every cluster which provide those various services. Our end goal is that any application can run in the cluster and have a human-readable address, a TLS cert, scale automatically, be able to utilize path-based routing, and only have the access that it needs. That’s no simple feat, with more than a few potential pitfalls along the way. This article should serve as a guide to taking a bare Kubernetes cluster and making it “fully operational.”
Disclaimer: This is intended as an intermediate guide. It assumes that you have a working Kubernetes cluster and understand most of the basic Kubernetes primitives.
This guide is going to consist largely of installing tools and controllers into your cluster. At Fairwinds we use Helm, a Kubernetes package manager, to install most (or all) of the various tools we use. In order to use Helm, you have to install the tiller into your cluster. This can be done using the Helm cli, with a dedicated service account for tiller, like so:
In addition to Helm, this guide is going to reference a Kubernetes deployment. If you are reading this, you already know what a deployment and a pod are. For ease of following the guide, I will be using the following deployment of a simple Nginx pod and building on it:
Let’s talk about how we get traffic from outside the cluster to your services running inside the cluster. There are a few different ways that Kubernetes allows us to do this natively, and we should explore those first.
NodePort Services
A NodePort service is exactly what it sounds like: it opens a port on all the nodes that can be used to route traffic to the Kubernetes service. It is defined in yaml like this:
And it ends up looking like this:
Notice we have an internal cluster IP, and that the port is defined as 80:32732. This indicates that when we try to reach any node on port 32732, we will be redirected to the service on port 80. It’s a useful construct, but it really only opens the door for an external load balancer to route the traffic. You don’t want to ask all of your customers to type 32732 at then end of our URLs.
LoadBalancer Services
In a supported cloud provider, a LoadBalancer service is awesome. It exposes a high port on all of the nodes in the cluster, and then it creates a cloud load balancer that uses that port to route traffic. The service definition is remarkably simple:
This creates a cloud load balancer in your cloud provider and attaches it to the port that it created. If we look at the service now, we see a couple of interesting things:
First, we see that there is an external IP address marked as <pending> because our cloud provider is still creating the resource. Second, we see that the port listed for the service is 80:32732. This indicates that the service has exposed a NodePort that will be used as the listener port for the load balancer.
LoadBalancer services are powerful and highly configurable with cloud-provider specific annotations, but they have a few limitations. The biggest issue is that every service you expose creates a separate load balancer. In a world of tens or hundreds of microservices, this adds up a to a lot of cloud load balancers. LoadBalancer services also don’t provide opportunities for path-based routing. Again, in a world of microservices (or even regular services), this might be a non-starter.
Ingress
Given the limitations of NodePort and LoadBalancer services, we need something a little more powerful. The Kubernetes developers anticipated this need and created the Ingress object. Ingresses require that you run a controller in your cluster to handle them, and they are a little more difficult to get running right out of the gate, but the payoffs are huge.
As previously mentioned, in order to use Ingress we need a controller. There are several controllers out there, such as Kong and HAProxy. At Fairwinds, we have found ingress-nginx, an Nginx-based controller, to be the easiest to use and one of the most complete solutions. There are many ways to install it, but we prefer to use Helm:
This will create the Nginx controller and expose it to the world using the now-familiar LoadBalancer service:
This service points to a set of controller pods that are running Nginx. Now we can create objects in Kubernetes called Ingresses that will configure Nginx to route traffic to our services inside the cluster.
Every service you deploy that needs to be exposed outside the cluster will now include an Ingress definition. Ingress definitions are also quite simple and look something like the following snippet:
Notice that it routes to the service we created. This tells Nginx to route traffic to that service when it comes into the cluster with the matching hostname. This is how we get path- and name-based routing. If we dig into the ingress controller pod and look at the config for Nginx, we will see a very familiar Nginx server block which corresponds to our new ingress.
Like the LoadBalancer service, Ingresses can incorporate very detailed configuration using annotations. These annotations are Nginx specific, and can configure different options in the controller.
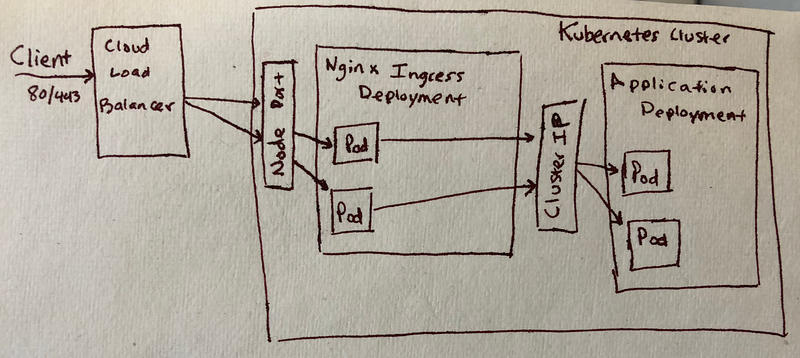
All of this means that we now have a way to run tens or hundreds of services behind a single Nginx proxy (or group of them), and these proxies are configured using easy to deploy Kubernetes objects. We can even use this to create TLS certificates and DNS, as we’ll see later. Right now we have a single cloud load balancer that handles TCP traffic to the controller, and we handle routing from inside the cluster. Here’s a little diagram to bring it all together:
Since we are using path- and name-based routing, we are going to need to create DNS entries. In the spirit of using controllers and other Kubernetes-native constructs, Fairwinds uses a project called external-dns. This controller will watch for annotations and certain types of objects and create DNS entries based on them. It is also deployed with Helm:
Note that credentials for your DNS provider will need to be specified as well, which depends on which DNS provider you are using. See here for more details.
Now when we create ingresses with DNS names, the external-dns controller will update our DNS provider with the IP address of the ingress controller.
Now that we have HTTP traffic to our services and easily accessible names, we want to secure them. HTTPS has become the de facto standard now that search engines optimize for it and browsers give ugly warnings if it’s not there. Traditionally this has been a pain point for operations teams. Back then, we had to generate the certs and do validation (sometimes from a manual portal), and then the certs still had to be deployed. Depending on the application we had to update application code or restart web servers. In the modern age, we have a few different options.
Cloud Provider Cert Storage
Amazon provides Amazon Certificate Manager (ACM). Combined with a LoadBalancer service and a special annotation, we can utilize an ACM cert to terminate TLS before it gets to the cluster. ACM automatically renews the certificate if you generate it using Route53 DNS. In a similar fashion, the ingress controller can incorporate a wildcard ACM certificate with its load balancer. This means that any Ingress we create that uses a domain in the wildcard gets TLS for free. This is a good option for a small number of services as long as you are comfortable with a wildcard. Some security policies don’t allow for it, and sometimes you want more than one subdomain. For another auto-validating option, we look further.
Let’s Encrypt
With the rise of cloud computing and privacy concerns, Let’s Encrypt set out to create a Certificate Authority anyone can use free of charge and fully automated. They have a specific protocol that allows you to validate and generate a certificate automatically and programmatically. Many implementations of the protocol have been done, but we at Fairwinds focus on cert-manager. This tool utilizes a custom controller inside of Kubernetes that requests and maintains certificates from Let’s Encrypt. This is coupled with a shim that watches for new Ingress objects and automatically generates certificates for them.
What all of that means is that you can deploy the cert-manager and not worry about TLS certificates ever again. Of course, it’s a little more complicated than that, but once deployed it makes management of certificates seamless.
In order to deploy cert-manager, we use Helm again:
Once the controller’s running, there are a few more pieces that need to be set up. There are two ways to do domain validation for certificates. We prefer to use DNS01 where possible at Fairwinds. In order to do this, your cluster nodes (or the cert manager) must have access to modify your DNS provider’s records. This is outside scope for this article, but it can be done with node roles in your cloud provider. The other option is to create a service account that you would then use in the following step.
Next you create an Issuer or ClusterIssuer which is responsible for configuring your Let’s Encrypt account and setting up the validation method that you’re going to use. For this guide I will use a ClusterIssuer and connect it to Let’s Encrypt. This is done by creating another Kubernetes resource:
There are a few things going on here:
dns-gcloud-configOnce you apply this resource, the cert-manager controller will attempt to set up your Let’s Encrypt account. If you do a kubectl describe clusterissuer letsencrypt-prod, you’ll see a few lines like this at the bottom of the output indicating your account was registered:
Now that you have an issuer and we have the ingress controller, we can redeploy our Ingress object to utilize cert-manager:
Notice the annotations that specify an ssl redirect and which ClusterIssuer to use in addition to the TLS block at the bottom of the ingress. There is also a secret name specified that cert-manager will use as the name for the certificate. We can verify that all of this is created like so:
So now we have a functional ingress with automatic TLS encryption routing traffic to our cluster. This leaves one more piece of the puzzle in order to have a fully operational service in Kubernetes.
I’m going to lump scaling and metrics together because we can’t scale an application without some sort of metrics to scale on, and they can be configured quickly and easily together. Kubernetes has a built-in mechanism called a horizontal pod autoscaler that can be used to maintain the number of replicas in a deployment based on metrics. In order to do this, we have to expose the metrics to the Kubernetes API. Unless you’re on GKE, which gives you this automatically, the easiest way to get metrics is to deploy the metrics-server into the cluster. This is very simple using Helm:
Once the controller starts and metrics are populated, we should be able to see resource utilization of pods and nodes like so:
With metrics available, we can create a horizontal pod autoscaler (HPA) for our deployment. The HPA is defined as another object and looks like this:
After a few minutes you can look at the HPA and see the current status:
This setup will watch the CPU usage of the pods and try to keep them at or below 80% utilization based on the CPU limits set on the deployment (see the original deployment). If the utilization goes too high, the HPA will scale up, and if it goes down for a time, it will scale down. This behavior can be changed to use any metric via a custom metrics provider. Tuning this correctly will allow your deployment to handle many varying traffic and load problems.
Scaling pods horizontally is great and allows for dynamic traffic handling, but it doesn’t control how many nodes are in the cluster. As we add more and more pods, scaling them up, we are going to need more nodes to handle all of the pods. This will become obvious when you see a bunch of pods in a Pending status; when you do a kubectl describe pod <pod-name> you’ll see a message about not being able to schedule the pod. We handle this by utilizing cluster autoscaling. The cluster autoscaler project will scale up if new pods cannot be scheduled, and it will keep an eye on node utilization, scaling down if it sees an opportunity.
Installation looks very different depending on which cloud provider you are using, but I briefly will cover AWS and GKE setup.
GKE
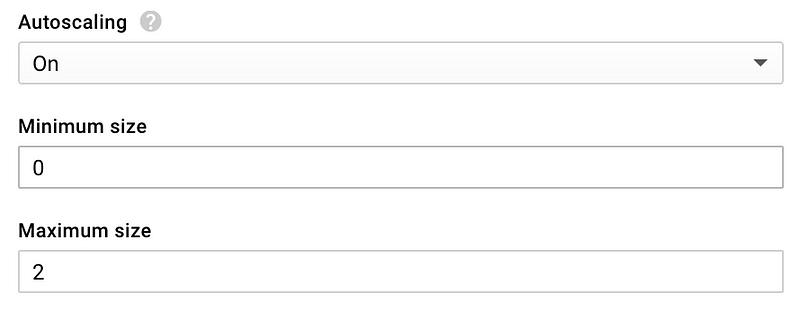
This one is really easy. GKE runs the cluster autoscaler by default if you turn autoscaling on in your node pools. You can do this in the console, or using whatever code you used to set up your cluster:
AWS
This again depends on how you created your cluster, but at Fairwinds we use kops. No matter how you built your cluster (excluding EKS), you still need to install the cluster-autoscaler. We use Helm to install the autoscaler using auto discovery of nodes.
This requires modifying your kops cluster and instance group definitions. This is beyond the scope of this article, but it is well documented here.
Managing RBAC (role-based access control) in Kubernetes is difficult. The cluster you built most likely has it enabled by default, and you probably haven’t configured it at all. This tutorial has already made use of RBAC inside the Helm charts that we deployed.
Out of the box there’s a bunch of resources that you can define:
Keeping these straight is confusing, and modifying permissions usually requires multiple sets of definitions. Fairwinds utilizes a controller that we wrote to make it simpler called rbac-manager. We can install it with (you guessed it) Helm:
We can now create an object called an rbacdefinition in order to manage our permissions and service accounts. Let’s go ahead and create one for our CI/CD system to use:
Applying this will create a service account called ci and bind it to the cluster role cluster-admin. In the future we can generate a kubeconfig file for our ci system using that service account. Going forward we can add to this in order to finely control all permissions for users and service accounts in the cluster.
You just installed a TON of tools into your cluster and added a lot of functionality. What did we just add?
All of these required one or more Helm charts to install, and may require different values depending on customizations that you want to make. It can be frustrating to run these commands and maintain these values files, especially if you manage multiple clusters. Fairwinds utilizes a homegrown tool called Autohelm to manage all of these charts. It allows you to maintain a single file that defines all of the charts you want to use. There are examples of all the different charts being deployed in the examples.md.
Now you have the awesome power of a “fully operational” Kubernetes cluster. Go forth and deploy services that are auto-scaling, highly available, and TLS encrypted. Please hit me up @sudermanjr with comments or requests for future topics.