Learn some of the steps you can take to diagnose an OOMKilled (Out of Memory) error in a Linux-based system. Out of memory errors in Kubernetes usually occur when a container or pod requests more memory than is available on the node or when the container or pod uses more memory than expected. Container engines also use exit codes when a container terminates; you can review those codes to learn why a container was terminated. Exit code 137 indicates SIGKILL; in Kubernetes this is often associated with OOMKills, but you should confirm via pod status/events (reason: OOMKilled) and node/kernel signals.
The following four factors commonly contribute to OOM errors in Kubernetes:
Resource requests and limits are not properly defined, resulting in a mismatch between the resources requested and the available resources.
Memory leaks in the application code or the container itself could cause memory usage to grow over time.
The kubelet is the primary node agent that runs on each worker node in a Kubernetes cluster. Among other things, the kubelet manages the state of each pod and container running on the node, including reporting resource usage to the apiserver and enforcing resource limits.
The Linux kernel provides a feature called the OOM Killer that Kubernetes relies on when a node or cgroup runs out of memory. This mechanism monitors node memory, and when memory is exhausted it selects one or more processes to kill. The kernel exposes an oom_score for every process on the host; as this score increases, the likelihood that the process will be killed also increases. There is another value, oom_score_adj, which lets kubelet influence that likelihood by adjusting how attractive a process is to the OOM Killer. Kubernetes determines a pod’s Quality of Service (QoS) class (Guaranteed, Burstable, or BestEffort) from its resource requests and limits, and then sets oom_score_adj accordingly so that lower‑QoS pods are more likely to be killed under memory pressure.
In Kubernetes, there is an important difference between a container being OOMKilled because it exceeded its own cgroup memory limit and a container being OOMKilled during node-level memory exhaustion. When a container hits its configured memory limit, the kernel kills that process within its cgroup, and kubelet reports the termination with reason OOMKilled. Under node-level memory pressure, kubelet may proactively evict Pods based on QoS and eviction thresholds, but if the node runs out of memory before eviction completes, the kernel OOM Killer can still terminate processes. When debugging, it helps to check for node MemoryPressure conditions, eviction-related events, and kernel logs (for example, dmesg) alongside the Pod’s OOMKilled status.
To prevent OOMKilled errors in Kubernetes, it's important toconfigure memory limits and requests for containers properly, as well as monitor memory usage and performance metrics. Prometheus is an open source systems monitoring and alerting toolkit thatgathers workload metrics from a Prometheus installation to provide resource usage data. Some teams also use Grafana, another open source project, as a backend to collect, query, and present the data.
There are key metrics that you need to be aware of regarding OOMKilled errors in Kubernetes. A few of the critical metrics you need to monitor include CPU and memory usage, network traffic, pod status, and node resources. In addition custom metrics can also be enabled on the application end to measure the errors and unexpected behaviors. These metrics can help you with debugging and troubleshooting OOMKilled errors, which helps you improve the stability and reliability of your applications.
In addition to pod- and container-level metrics, it is important to watch node-level signals that indicate when Kubernetes is under memory pressure. Node conditions such as MemoryPressure, eviction-related events, and metrics tied to eviction thresholds (for example, memory.available on the node) help you understand when the kubelet may start evicting pods or when the node is at risk of a kernel out-of-memory event. Tracking these node signals alongside pod metrics makes it easier to distinguish “pod hit its memory limit” from broader node-level memory exhaustion.
The key metrics to monitor include:
Memory usage: This metric measures the amount of memory used by containers or pods. When you monitor memory usage, it helps you identify when a container or pod is close to exceeding its memory limit, which can help prevent OOMKilled errors.
Memory limits: This metric specifies the maximum amount of memory a container or pod is allowed to consume. When you set appropriate memory limits for pod memory, it helps you prevent containers or pods from consuming too much memory and triggering OOMKilled errors.
CPU usage: This metric measures the amount of CPU resources used by containers or pods. When you monitor CPU usage, it can help you identify particularly high CPU usage which can be a contributing factor for workloads that become memory-inefficient when heavily CPU-throttled.
Restart count: This metric measures the number of times a container or pod has been restarted. When you monitor restart count, it helps you identify whether a container or pod is experiencing OOMKilled errors and determine whether the issue is persistent or intermittent.
Node resource utilization: As mentioned above, heavy usage from neighboring pods on a node can cause resource exhaustion on the node, which can be a factor in causing OOMKills
These QoS classes influence how likely a pod is to be killed under memory pressure:
Open source projects, such as Goldilocks, can help you adjust Kubernetes resource requests. By monitoring these metrics and setting limits, you can identify and address memory-related issues in your Kubernetes cluster and prevent OOMKilled errors from impacting the quality of service.
In Kubernetes, a container or pod may be restarted for a number of reasons, including to recover from runtime failures, to update the application or configuration, or due to resource constraints. If a container or pod experiences an OOMKilled error, it may be restarted automatically by Kubernetes, depending on the configuration of your cluster. Kubernetes provides multiple options for you to control how often and under what conditions a container or pod should be restarted.
Restarting the container or pod can provide a temporary solution to the problem by freeing up memory and CPU resources. However, if you do not address the root cause of the OOMKilled error, the container or pod may continue to experience the same error and be restarted repeatedly.
If you see repeated restarts, it may indicate a persistent issue with the container or pod, such as a memory leak or inadequate resource allocation. In these cases, you need to diagnose the root cause of the error and address it to prevent further OOMKilled errors and keep your Kubernetes cluster running smoothly.
The command-line tool that you use to interact with Kubernetes clusters is kubectl. It provides a wide range of commands for managing and troubleshooting Kubernetes resources, including pods, containers, services, and nodes. You can use the following commands for this purpose:

Using kubectl with other diagnostic tools, such as monitoring systems or profiling tools, helps you diagnose and troubleshoot OOMKilled errors in your Kubernetes cluster as well as set parameters appropriately. You can also look at the YAML to see a breakdown of allocatable resources.
The API server is a key component of the Kubernetes control plane and serves as the central point of communication for all other components in the cluster. When a pod or container experiences an OOMKilled error, it sends an event to the Kubernetes API server to indicate that the container has been terminated due to out of memory errors. Other Kubernetes components, such as the scheduler or replica controller, can use this event information to determine how to handle the terminated container or pod.
The Kubernetes API server also exposes a range of APIs that can be used to manage and monitor Kubernetes resources, including pods, containers, services, and nodes. Using these APIs in conjunction with other diagnostic tools, such as kubectl, can help you diagnose and troubleshoot OOMKilled errors.
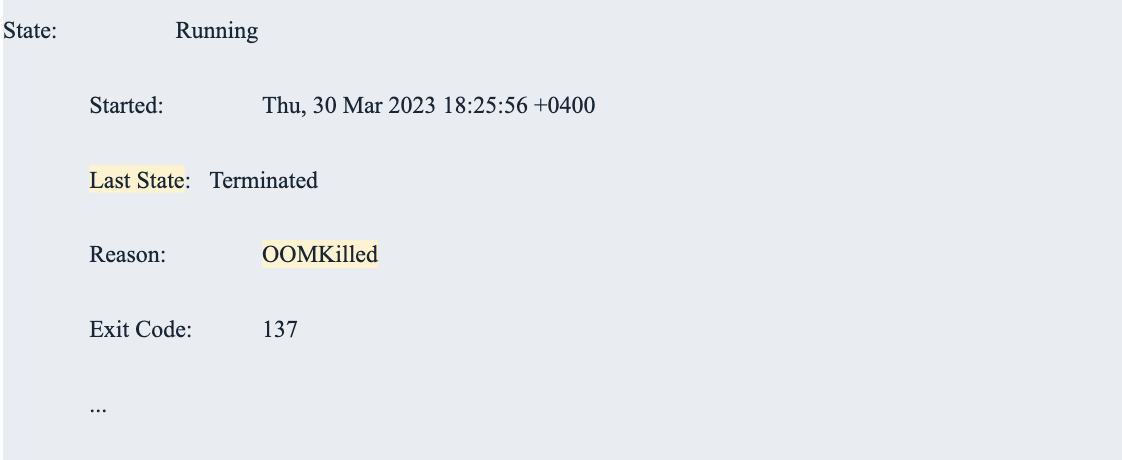
When a container in a pod is terminated due to an OOMKilled error, the pod's status is updated to reflect this, setting the container's status within the pod to Terminated and the reason for termination to OOMKilled. The pod's overall status then depends on the number of containers still running in that pod.
If there are other containers still running within the pod, the pod's phase remains Running. When containers are terminated due to OOMKilled, kubelet may restart them depending on the pod’s restartPolicy, so the pod can stay in the Running phase even if a container has been OOMKilled multiple times. A pod typically transitions to a terminal phase such as Failed only when its containers have terminated and will not be restarted (for example, restartPolicy: Never), or when it is explicitly evicted or deleted.
While memory limits play a crucial role in preventing OOMKilled errors in Kubernetes, setting appropriate CPU limits can also help reduce the risk indirectly by preventing extreme CPU throttling.
CPU limits are used to control the amount of CPU resources a container or pod can consume. When a container or pod exceeds its CPU limit, Kubernetes may throttle the container or pod, which can cause it to slow or become unresponsive. If a container or pod is heavily CPU throttled, it can indirectly increase the risk of OOMKilled errors, for example by slowing garbage collection or other memory-reclaiming work.
By setting appropriate CPU limits, you can ensure that containers or pods do not consume more CPU resources than they require. Setting CPU limits can also help you ensure that other containers or pods on the same node have access to sufficient CPU resources, which can prevent resource starvation in your Kubernetes cluster.
Setting CPU limits is not going to prevent all OOMKilled errors, of course. Other factors, such as memory leaks or inefficient resource allocation, can still lead to OOMKilled errors. When you set appropriate CPU limits and memory limits, it can help to reduce the risk of OOMKilled errors.
Memory limits play a crucial role in preventing OOMKilled errors in Kubernetes. When a container or pod requests memory resources, Kubernetes sets a limit on the amount of memory that can be used by that container or pod.
If a container or pod exceeds its memory limit, Kubernetes may terminate the container or pod and generate an OOMKilled error because the system is unable to allocate more memory to the container or pod.
Setting appropriate memory limits can prevent OOMKilled errors by ensuring that containers or pods do not consume more memory than they require. If you find that a container or pod needs more memory than its current limit, you can increase the limit to accommodate the additional memory requirements.
Platform engineers work closely with development teams to prevent and address OOMKilled errors in Kubernetes. Platform engineering and DevOps teams manage the deployment, operation, and maintenance of applications in production, and they work hard to ensure that those applications and services are reliable, stable, and scalable.
When it comes to preventing OOMKilled errors, here are several steps you can take:
By adopting best practices and leveraging tools and technologies that support containerization and orchestration, you can help ensure the stability and reliability of your organization’s applications and services in production. Need help? Fairwinds' Managed Kubernetes has the expertise you need to focus on your differentiators, instead of your infrastructure.