This series is intended for engineers new to Kubernetes and GKE. It provides a basic overview of Kubernetes, definitions and a quick start for building a Kubernetes cluster in GKE and your first multi-tier webapp. If you are looking for more in-depth help, get in touch.
Getting started with Kubernetes requires some basic architecture understanding. Here we summarize control plane and worker nodes, the Kubernetes architecture and definitions of pods, labels, selectors, deployments and services.
The control plane consists of components such as the API server, scheduler and controllers that run on control plane nodes, while the kubelet runs on every worker node and reports node and pod status back to the control plane. The control plane:
Worker nodes are where “stuff” gets done and where all your apps will live. Workers:
There are two primary types of machines - control plane nodes and workers - both referred to as nodes. Most often when someone refers to a node, they are talking about a worker node.
Control plane nodes do a few things:
Note that if you’re on GKE, EKS, AKS, or another managed Kubernetes service, you won’t need to worry about provisioning or managing the control plane nodes yourself – the provider patches, scales and runs them for you. In these services, the provider runs the control plane as a highly available set of nodes behind the scenes, so you still get redundancy without managing those machines directly.
Source: Datadog
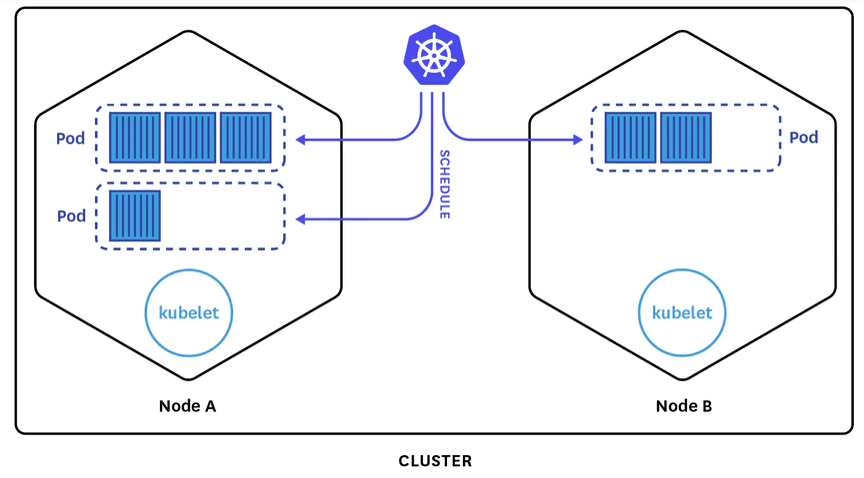
In the center, you can see the Kubernetes logo. That signifies the control plane. If you are using a managed service like GKE, that control plane is managed by the service.
The API runs in the control plane. When issuing a kubectl command, this is what you’ll be talking to. As workloads are submitted to the API, the API will schedule them on various worker nodes.
This diagram also shows Node A and Node B. Every worker node runs a kubelet, which is a daemon process that communicates with the control plane about the amount of available resources, what work is pending, and if work can be scheduled to the node it is managing.
There are then representations of a few pods. Pods are a group of containers (often built for an OCI‑compatible runtime such as Docker or containerd) that are scheduled on a node.
All work is submitted to the Kubernetes API as these groupings of containers, or pods. For added resiliency, Kubernetes can distribute multiple replicas of the same pod specification across different nodes, so even if one crashes, you’ll have a backup.
Here are vocabulary and concepts that are important to know when you start working across the Kubernetes API.
Kubernetes is organized into a series of objects for your typical CRUD operations, i.e. create, read, update and delete through the API.
A pod is a set of one or more containers scheduled on the same physical or virtual machine that acts as a unit. When you create a declaration of the pod, you can define this with any number of containers that live inside of the pod.
Pods also share a network internally - a private network shared whenever a pod is scheduled across all the containers inside the pod. They can also share filesystem volumes. Similar to Docker that uses -volumes-from, it’s the same concept with Kubernetes when running multiple containers inside a pod. You can share ephemeral or copy-on-write style storage from within the pod.
Typically you won’t create a pod directly - instead you’ll create a higher level object like a Deployment or StatefulSet that includes a pod specification (see below).
A deployment is an abstraction to the pod. It allows you to have extra functionality and control on top of the pod to say how many instances of a pod you want to run across nodes or if you want to define your rolling update strategy (for example only roll one pod at a time, wait 30 seconds in between). This allows you to control your deployments based on your requirements in order to have zero downtime as you bring up a new process and deprecate old ones. Pods are ephemeral and are almost always managed by these higher‑level controllers in production clusters.
Deployments offer the following functionality:
Deployments are typically used for stateless workloads, while StatefulSets are preferred for applications that require stable identities and persistent storage, such as databases.
Here you can see this deployment is called “webapp”. It desires two replicas to exist.
It finds and manages the pods spawned by it using the label selector, which is set to “app: webapp”. Below that you see the abbreviated template for the pods it will spawn, which will have the label.
apiVersion: apps/v1beta2
kind: Deployment
metadata:
  name: webapp
spec:
  replicas: 2
  selector:
    matchLabels:
      app: webapp
  template:
    metadata:
      labels:
        app: webapp
    spec:
      containers:
        - name: webapp
          image: nginx
          ports:
          - containerPort: 8080
            name: http
          env:
          - name: REDIS_HOST
            value: 'redis-master'
Every Kubernetes object gives you the opportunity to attach metadata through labels - a series of arbitrary key-value pairs attached to objects. Typically, these are identifying attributes that are meaningful to users making declarations.
Labels inherently do not imply semantics to the core system. This means that there’s no functionality that you are going to get out of labels explicitly that is important to the Kubernetes systems. Instead, they’re utilized by DevOps teams to query for particular sets of objects.
Labels are very important as they can be used to orchestrate, attach and identify different objects with the Kubernetes system. Labels can be attached to an object via create or update operation. You can either attach a label when creating a pod or apply a label to a pod already running through an update.
We expect many objects to have the same labels because labels are not unique. For instance, you might want to label all the resources associated with your website frontend as app=frontend, while all the backend resources get app=backend. Or maybe you want them both as app=website - the way you utilize labels is entirely up to you.
Here’s what a snippet of a label might look like inside the context of a Kubernetes YAML definition:
apiVersion: v1
kind: Pod
(...)
metadata:
  labels:
    app: backend
    tier: primary
    release: staging
In many modern clusters you will also see standardized label keys such as app.kubernetes.io/name and app.kubernetes.io/component, which make it easier for tooling to understand and group your workloads. You can designate labels to be anything that you want with any sort of semantics that make sense to you, because these are yours to be able to orchestrate different things within the Kubernetes systems.
Selectors give you the ability to take Kubernetes objects and interrelate them to different objects with labels already applied. Selectors identify a set of objects through filtering. The set of objects that are identified and filtered have the relevant labels.
Empty selectors will match all labels. In this example, the deployment will apply to pods that have the label app:redis. In a Deployment, the spec.selector.matchLabels must match the labels you set on the Pod template (spec.template.metadata.labels), or Kubernetes will reject the manifest.
kind: Deployment
metadata:
  name: webapp
spec:
  replicas: 2
  selector:
    matchLabels:
      app: redis
  template:
    spec:
      containers:
  (...)
Outside of just the context of containers and metadata are services - key to Kubernetes. A service is a network construct that defines a consistent way to access pods. If you submit a deployment to the Kubernetes API and that deployment spins up five different pods of a web service, you’ll need a way to route HTTP traffic to those pods, with load-balancing methods like round-robin (for example). You’ll use a service to do this.
Services:
Services find a pod to route traffic:
Here is an example of a YAML definition of a service. We have a metadata section with the service named webapp. On line 15 we have a selector. The selector is a key of app with a value of webapp. It means that every pod you have running with the label of app and value of webapp is relevant. Any traffic that accesses this service will be routed to a pod matching that label. If you have five relevant pods, but then one crashes, the service will know the pod is no longer healthy and thus only route traffic to the remaining four until another pod comes up.
apiVersion: v1
kind: Service
metadata:
  name: webapp
  labels:
    app: webapp
spec:
   type: LoadBalancer
   ports:
     - name: http
       protocol: TCP
       port: 80
       targetPort: http
   selector:
     app: webapp
The same holds true for horizontal autoscaling. For example, if you have ten pods running that are resource constrained, Kubernetes can spin up five more pods with the same labels to handle the load. It is the services’ responsibility to understand that there are now 15 pods and traffic must be distributed accordingly.
Services provide, within the cluster, a way to load balance between pods. Services can also talk to external cloud providers and spin up cloud resources such as cloud load balancers, e.g. application load balancers (ALBs), elastic load balancers (ELBs). This is why Kubernetes really is cloud native: there is a lot of functionality built into the system to be able to integrate with whatever cloud provider you might be working on.
There are four types of services.
ClusterIP exposes the Service on an internal IP. This is typically used for Services only accessed by other workloads running in the cluster. Redis is a good example of this. You probably don’t want your Redis data store to be accessible from the public internet to read/write from. You would assign a ClusterIP Service to a Redis implementation running in your Kubernetes cluster so it can only be accessed by other workloads inside the cluster.
Most application backends in production use ClusterIP Services and are then fronted by Ingress or Gateway API resources for external HTTP/S access.
2. NodePort: port on every node
NodePort exposes a Service on each worker node’s IP on a static port.
Say you have a deployment that spins up pods running on three machines in a five node cluster. If you assign a node port service to this, it would statically map a port directly on those virtual machines and would be accessible from the IP, not assigned to the pod, but to the IP assigned to the actual nodes they are running on.
This is useful if you are running daemonsets and you have log aggregators of monitoring systems that need to be available.
Be careful of port collisions or pod rescheduling.
A LoadBalancer Service exposes the Service externally using a cloud provider’s load balancer. GCP offers cloud load balancers and AWS offers ALBs and ELBs. In your Service definition you can request a LoadBalancer type and it will spin up the appropriate cloud load balancer for you, handling all the networking under the covers. Note that this may incur additional costs from your cloud provider. Behind the scenes, many implementations still allocate a NodePort, but modern controllers can also route directly to pods and disable node ports using spec.allocateLoadBalancerNodePorts: false.
You can also request internal (private) load balancers with annotations, such as networking.gke.io/load-balancer-type: "Internal" on GKE or service.beta.kubernetes.io/aws-load-balancer-scheme: "internal" on AWS.
For advanced scenarios, the spec.loadBalancerClass field lets you choose a specific load balancer implementation instead of the default cloud‑provider integration.
ExternalName maps the Service to an external name via a DNS provider returning a CNAME record.
Similar to LoadBalancers, although ExternalName has interaction directly with the DNS provider and does not proxy traffic through cluster nodes.
In many modern clusters, you will front Services with Ingress or Gateway API resources. Gateway API is the newer, more expressive model the community is standardizing on. Ingress and Gateway controllers handle HTTP/S routing, TLS termination and host/path‑based routing rules, while Services continue to represent the backend pods. For most web applications in 2025–2026, a common pattern is: pods → ClusterIP Service → Ingress or Gateway → cloud load balancer.
Kubernetes now uses EndpointSlices as the default way to represent Service backends, which scales better than the older Endpoints API.
Services also support options such as sessionAffinity, internalTrafficPolicy and externalTrafficPolicy for more advanced traffic routing and zone‑aware behavior, but those are advanced topics beyond this basic introduction.
Within the cluster, most environments use CoreDNS, and Services are typically reachable at DNS names like service-name.namespace.svc.cluster.local.

Originally published 11 May, 2020.